Monday, September 5, 2011

Turbo


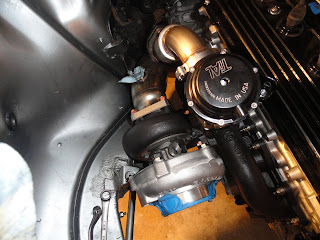
This is the Garrett gtx3071 turbocharger, which I am installing. first install the waste gate flange onto the exhaust manifold  and the corresponding studs for the turbo with anti seize paste.
Like so. then you can install the turbo onto that, first Fit the down pipe in between the axle and sub frame and let it rest there, will make it easier to maneuver around the turbo.
As you can see the down pipe is in position yet not attached yet, put it there before installing the turbo then attach it after words.
With it attached to the turbo.
With the External waste gate installed as well.
And the result is this, the turbo/waste gate is installed.
Warning do not start up a car on a fresh turbo without priming it first. will get to that later. 

Monday, August 29, 2011

Exhaust manifold

Installing the exhaust manifold was pretty simple, Just screw in the studs first using high temperature anti-seize paste and then put the gasket and manifold on the studs and bolt it all together, it kinda was a pain because there was a whole bunch of stuff in my way so had like no room to bolt it all together, would have been easier to attach to the head before mounting the head to the long block. This is a Rs2 exhaust header replica.
Waste gate attached to the top flange and turbo to the bottom one.

Tuesday, August 23, 2011

Master cylinder

This is the vacuum booster where the mastercylinder on the brake system goes. When you press down the brake pedal, a rod goes inside the master cylinder and compresses the brake fluid.
This gasket is old, was not able to locate a new one so i will just be putting gasket sealer on it to be sure, it has to hold a vacuum.

put the sealer on both sides and insert into the booster and bolt it down,
after the reservoir is installed

Axle install


Ok, first take any lithium based grease and lob it in the flange, making sure no big air bubbles, and a lot is needed.
then after that it will look like this. and then just stick the axle on it and bolt it together.
then it is installed. repeat for all other axles as well.

Thursday, August 11, 2011

Fuel rail install

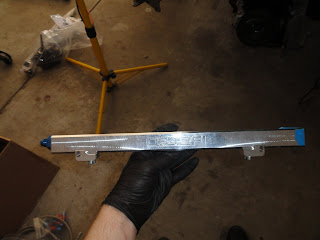
Take your fuel injectors and the fuel rail.
then just squeeze the injectors into the rail making sure not to pinch the O-rings or you will have a gas leak
will be hard to do.
After they're in the rail, just insert it onto the intake manifold and lightly hammer down with a rubber mallet making sure not the pinch the other O-ring as well.

The fuel injectors and rail have just been installed, simple, the rail is built by 034 for the 20v head of the Audi Inline 5 motor.

Intake manifold

So I installed the Intake manifold, pretty simple to do. I installed a Wagner tuning high output intake manifold with a 034 intake manifold gasket/spacer.
On this intake manifold it puts the throttle body near the front of the radiator. I'll be using an electric power steering pump, so I don't have to worry about fitting of the stock belt driven pump. However out of shear curiosity I'm still going to try to get the old broken pump in there just to see if it would fit.
The stock S2 and Rs2 intake manifolds are built quite a bit like this one however the throttle body is located behind the cylinder head and therefore have no problem with the stock power steering pump.

Sunday, August 7, 2011

getting the engine in.

So first off I lubed up the plastic tab and the metal rod the throwout bearing goes on, be gentle on the lube making sure none gets on the clutch/flywheel.
I removed this guide dowel, its to big, common when installing different transmissions into cars, this tranny from a Audi 2000 S4.
Line everything up, the transmission should just slide into the pilot bearing.. do "NOT" force anything, you will break your car.
Bolt it all together, then hoist it up onto the engine hoist, you will need an engine balancer as well.

Now the engine is in the car with the transmission, in retrospect it would have been easier to put the transmission into the car first then the transmission onto that, however its all together now.
This is the stock engine block with an upgrade to a 20 valve head gotten from a 1990 coupe quattro, stock was 10 valve, the Long block was built to withstand over 1000 horsepower by 034.

Saturday, July 23, 2011

clutch install

This is a flywheel, with 60-2 tooth reduction for a sensor to pick up. It goes on the back of the engine, connecting to the crankshaft.
This is the back of the engine, that hole is where the starter motor goes.
First clean off the flywheel with a wire brush and make sure no oil/metal or anything else is on it.
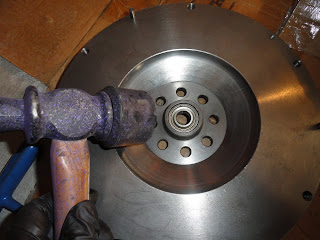
Take the pilot bearing which fits in the flywheel and the spline of the transmission fits into. Comes already lubed however, put just a very tiny amount on it and wipe any excess off, make sure none of the lube gets on the flywheel. Any lithium based grease will work.
Gently tap the bearing into the flywheel after greasing it very lightly.
Then you will put it onto the engine, Most flywheels will only fit on one way like this one I used. just keep turning it until all screw holes line up.
Lol this time I got a new "old" style torque wrench so it wont break bolts...hopefully.
This part is really important, torque the bolts to exactly 74 foot pounds. Any less the flywheel fall off while the car is running.

This is the clutch disc, which rests in between the flywheel and the pressure plate.

This is a clutch alignment tool, to fit the clutch plate onto the flywheel.
Fits into the grooves onto the clutch plate.
then put it on the flywheel.
That is the pressure plate which goes over both and gets torqued to 18 foot pounds.
then  after its all together and aligned in the center, you can remove the clutch alignment tool.

Ignition coils install

These are Ignition coils, this car originally used a distributor, however with the new ECU (engine control unit) the engine ignition will be controlled electronically.
This is the result after i assembled it. not sure if it matters but the coil connections where closest to the firewall for this application. Had to file down some metal tabs at the end to assemble this, not a problem, really easy. just wear a particle respirator because metal particles can be slightly dangerous.
You will need one of these, A tap and die set, taps make female connections and dies make male connections you will also need the corresponding drills as specified in the supplied glossary.
I however did not have metric drills and all I had were standard and didn't want to make a trip to the store. After doing some googling I found the closest size between metric and standard, Will be different for everyone. so pick out your bolts you wish to use and Match the threads on your tap. then find your corresponding drill.
rest the thread of the tap and the screw, this will tell you if it the right size. Has to be a automobile bolt, once you find your drill and tap get a scrap piece of metal to test this on just to be sure, you only get one attempt on your automobile.
Use one of these also to check the threads. it comes in the kit. its called a thread gauge.
Keep you drill well oiled or you will warp your host metal or the drill bit.
keep your drill level while drilling, I had a level on my drill to help.
I drilled the hole on a scrap piece, keeping it well oiled.
This is the tap and the tap holder.
Tape a level to the unit and hold it up where you want and mark the holes.
I used string to map out a lot of the engine in the engine compartment to make sure the spot i picked would not get in the way of any other parts...that would be bad ;)
one of the holes that i was tapping was hard to get to so I just used a vice grip instead of the tap holder.
stick the tap in the hole and turn it to thread the hole.
I used this to cover up the old welds i broke off to get the old battery stand off.
Like this!
then painted it.
This is the result, after all that work, this will make the cars fuel ignite. woot.